More Jabba the Hutt Jack O’ Lanterns! (2014 Edition)
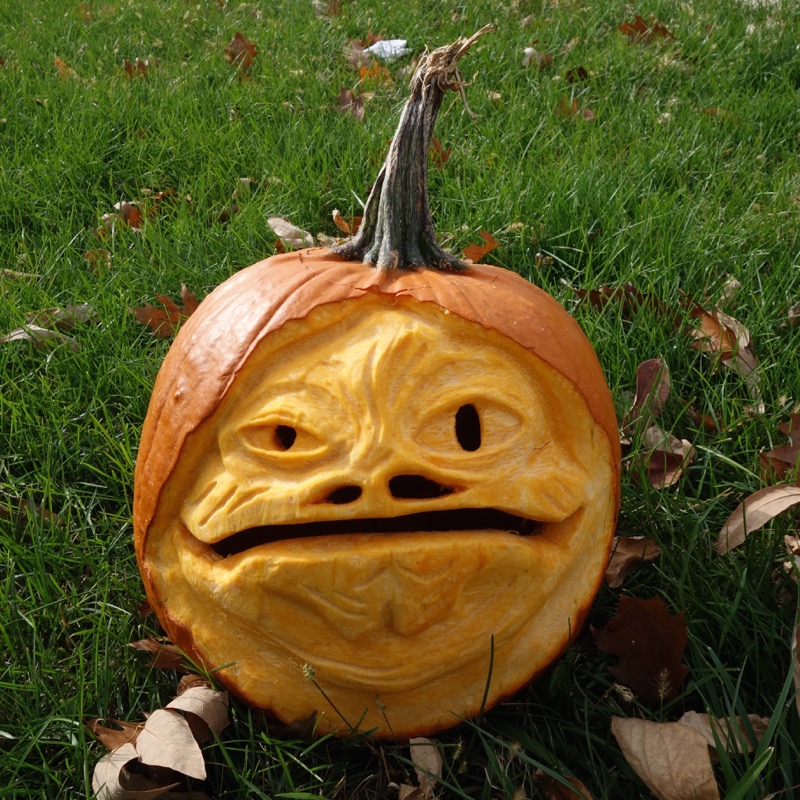
I mentioned in my previous post about carving a “Funkin” artificial pumpkin that I would try to carve a real pumpkin this year, and thanks to a brief lull in my work schedule, I was able to do two of them. The one above is based more on the Clone Wars version of Jabba than my previous ones, although I’m not sure you can quite tell that.
As I’ve mentioned in the past, I use a 3D sculpting technique that people like Ray Villafane have pioneered. You use tools that are normally used for sculpting clay to scrap off the outer layer of rind and then “sculpt” the inner parts. It can be pretty difficult and time-consuming, but I find it rewarding, and it’s becoming a kind of annual tradition. Of course I’m nowhere near Ray’s level — my sculpting skills are still pretty basic. Still, each one is a learning experience.
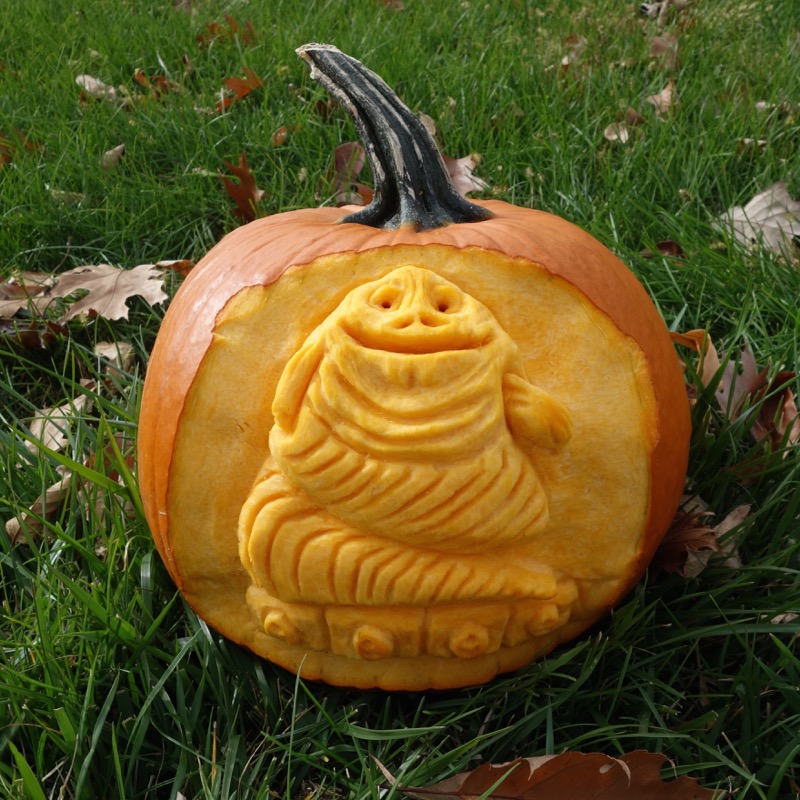
After doing the first one, it occurred to me that I’ve never tried to do a full-body Jabba on a pumpkin, so I did this one of him on his throne. It’s loosely based on the vintage Sigma Jabba the Hutt bank.
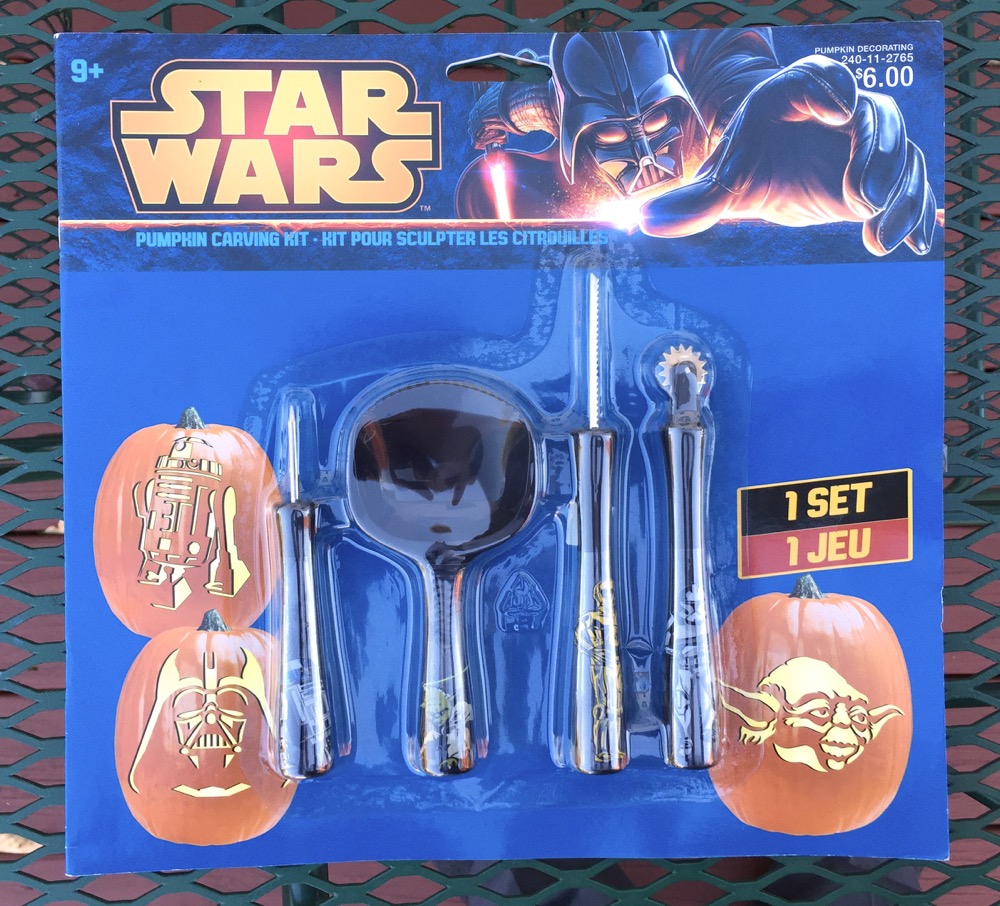
Star Wars Pumpkin Carving Kit & Jabba the Hutt “Funkin”

Regular readers of the site will know that I’ve carved a number of Star Wars-themed pumpkins. I’ve done a couple of Jabbas (version 1 and version 2), a Bib Fortuna, a Rancor, and last year a Gamorrean Guard (that one won a prize).

But this kind of carving can be rather tiring and time-consuming, so when my sister suggested trying out “Funkins” (foam craft pumpkins that can be carved similar to real ones) I thought maybe I would take it easy this year and try one. They were already on sale at the local craft store, although they’re still more expensive than most actual pumpkins. The advantage, I figured, was that we would be able to save it and use it every year.

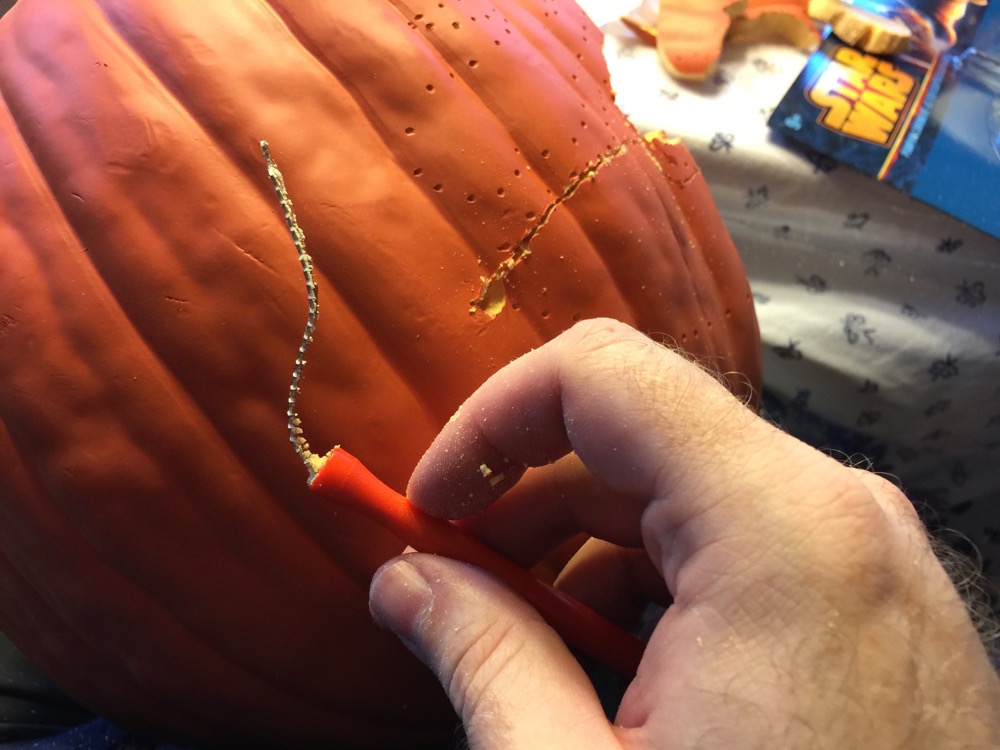
Also, I discovered that a Star Wars pumpkin carving kit (pictured at the top of the post) has a Jabba the Hutt pattern in it. I think it’s available at many retailers, but I got mine at Target. It comes with a number of patterns, and the idea is that you tape the pattern to the pumpkin, then use a metal spike to poke holes tracing its outline. Then you can follow the holes when carving the pumpkin. In practice, this is a little tricky, unless you have a pumpkin that’s exactly the right size and shape. I think I put too many holes in as well, but I wanted to make sure I got the shape.

When you remove the pattern, you get something like what you see below. It’s a little hard to see the pattern in this, but if you refer to the paper you can more or less make sense of it.

Now, as I said, Funkins are artificial pumpkins made of very dense foam. It’s actually pretty hard stuff. It’s also apparently made in two halves that are glued together, so when you come up against that seam while carving, it can be hard to get through. You’re supposed to be able to use traditional pumpkin carving tools, but my feeling was that they weren’t quite up to the task. I had a variety of sizes and shapes, but carving was not easy. I bent/broke more than one tool (luckily I got most of them after Halloween last year at 90% off).
This pattern has a lot of detail and some pretty thin lines in it. I’m not sure if it would work better with a real pumpkin or not, but I nearly broke the whole thing several times and had to resort to using glue in a few places to strengthen it a bit. I think in hindsight it might have been better to just work on scraping off the surface of the pumpkin rather than carving chunks out. I wasn’t very impressed with the final product. It’s difficult to make out the design, and there are quite a few stray holes left over as well.

However, when I tried lighting it up, it looked pretty good! I had to search for an old LED light strip I had, since they tell you specifically not to put open flames in these things. I think I’m still going to try and carve an actual pumpkin the year, though.

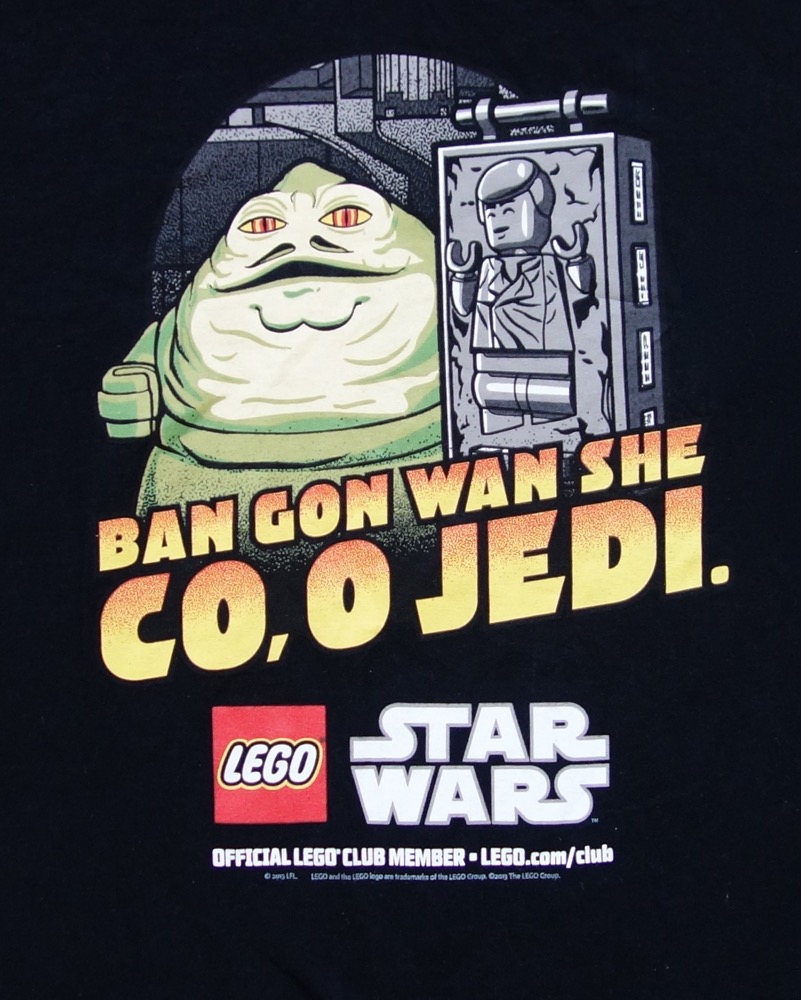
LEGO Club Shirt with Jabba the Hutt and Han in Carbonite
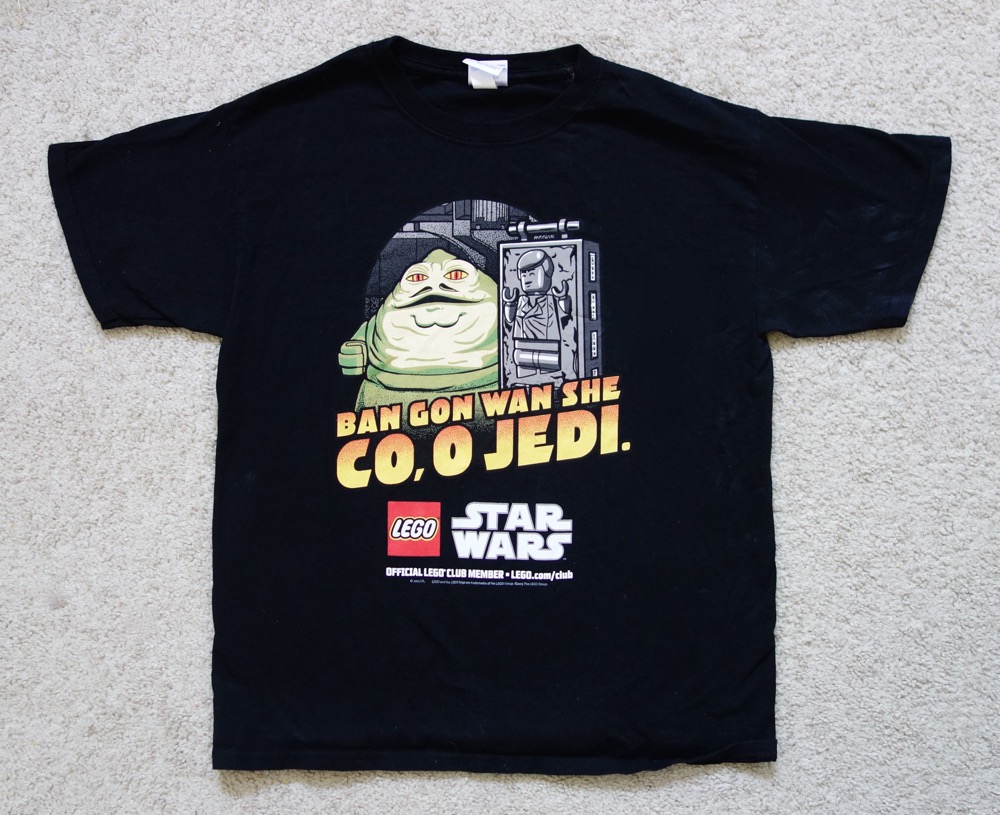
I have a couple of LEGO Star Wars shirts that happen to have Jabba on them (see here and here), but this is the first I’ve seen that is completely Jabba-centric. It was apparently available at LEGO Club meetings where (from what I can tell) you would pay around $20 to get a shirt and a bag of bricks. I assume it was made available around the time that the LEGO Jabba’s Palace set was released in 2012.
The Huttese message reads “Ban gone wan she co, o Jedi” (although I’ve usually seen this written as “Ban gon wan she co, cah”), which means “There will be no bargain.”
Jabba the Hutt Polo Shirt (Lacoste Parody) from Super 7 & WeLoveFine
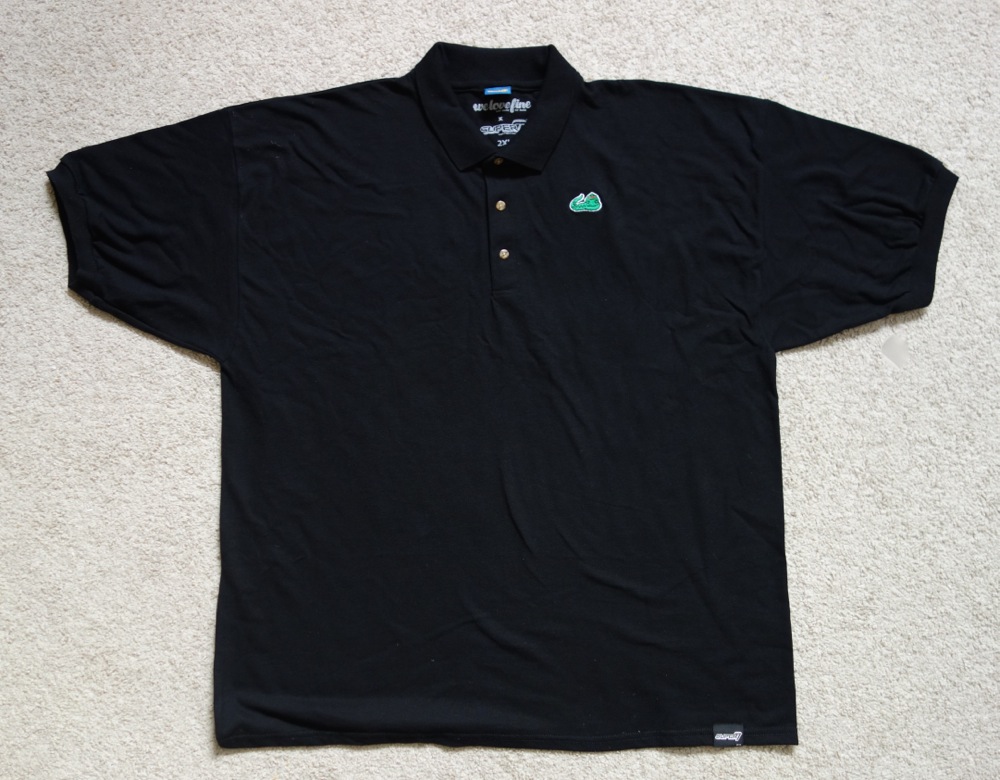
Apologies for the lack of updates recently. I’ve been very busy with work, and the introduction of the new iPhones has also been a bit distracting for me… In any case, here is something that I first posted about in July. They became available at Super7’s online store a while back and I ordered right away, but it took several weeks to ship even though they claimed it was in stock. It seems they ran out and had to have more made. It’s a Super7 exclusive, but also bears the WeLoveFine logo, so was apparently made in conjunction with them.
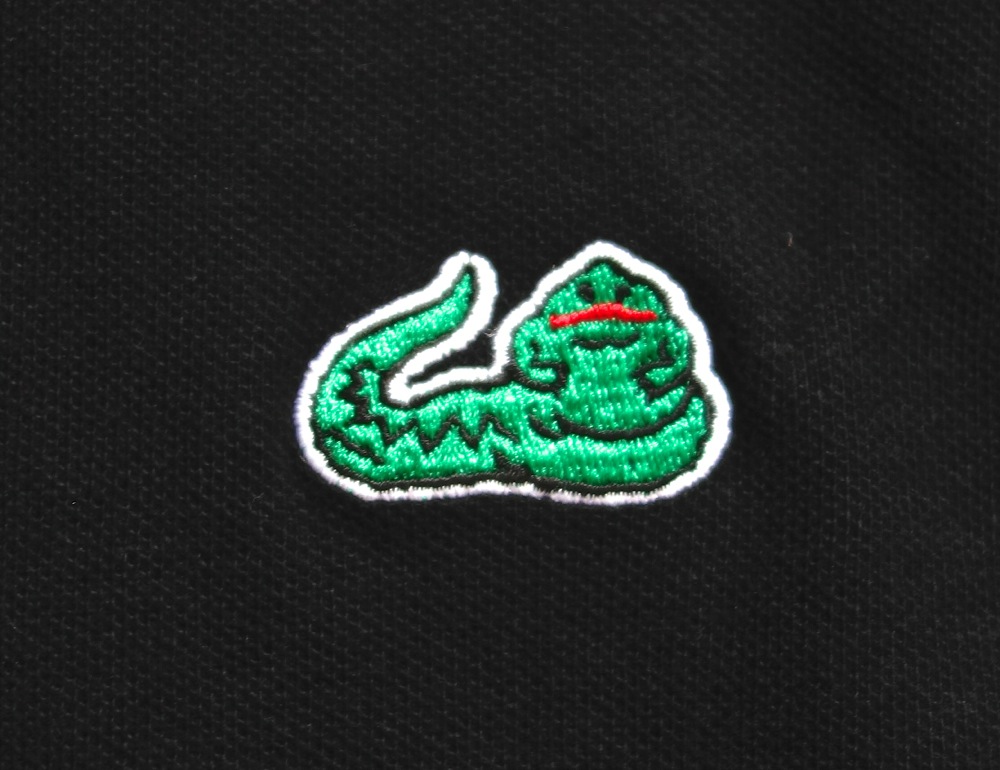
This is obviously a parody of the iconic Lacoste alligator polo, with Jabba the Hutt playing the part of the alligator. The patch is pretty well done, but if you look at the image on their site, it seems like the position of the patch is off on mine. I think it may just be because mine is an XXL, while the one in the picture is probably an M or something. Still, it struck me as a little off when I received it. I think it should be a couple of inches closer to the left sleeve.
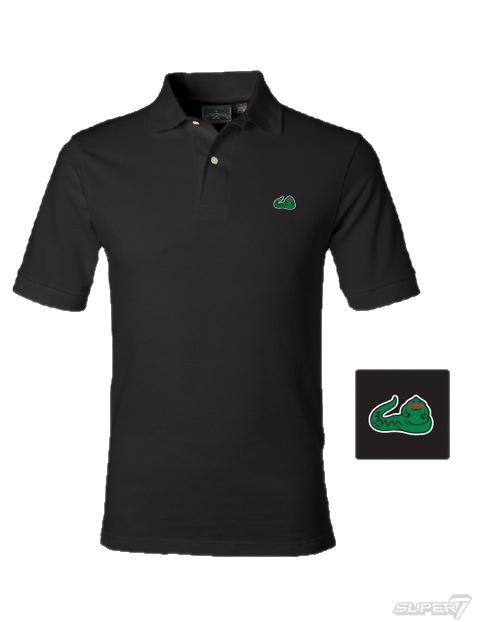
The shirt is $45 plus almost $10 shipping. When you consider that it’s basically just a normal black polo with the exception of the tiny patch, that seems pretty expensive. Quality-wise, the shirt is okay, but to be frank the polos you can get at Target seem to be more comfortable and better quality — at least to me. I have a LOT of Jabba the Hutt-themed t-shirts, but I don’t actually like wearing t-shirts much. I generally wear polos just because I find them comfortable, so this seemed like a natural fit for me. But I have mixed feelings about it due to the expense and somewhat mediocre quality.
“Your Mind Powers Will Not Work On Me Boy” T-Shirt With Jabba the Hutt

I resisted getting this shirt for two reasons. The main one was that instead of using a picture of the actual Jabba from Return of the Jedi or some original artwork, they just used a stock photo of the Sideshow Jabba the Hutt figure that’s easily found on something like a Google image search.

All it takes is a few minutes in Photoshop to turn it into the design they went with, and frankly it seems lazy. I even wrote an entire blog post about people making products using images of the Sideshow Jabba, but this an officially licensed shirt. It’s not unusual to see artists and others use collectibles like statues or figures as the basis for their work, and on the one hand I understand it since it’s often actually easier to get photos of these things than good reference photos from the movies. But it kind of ruins it for me when I can tell right away that this has been done.
The other reason I didn’t get it is that it’s rather expensive — $22 from 80stees.com. But I eventually got one very cheaply on eBay so I decided to get it. It’s not a bad design, but it just seems odd for them to use the Sideshow Jabba as the basis for it.
Jabba the Hutt Sculpture by Me
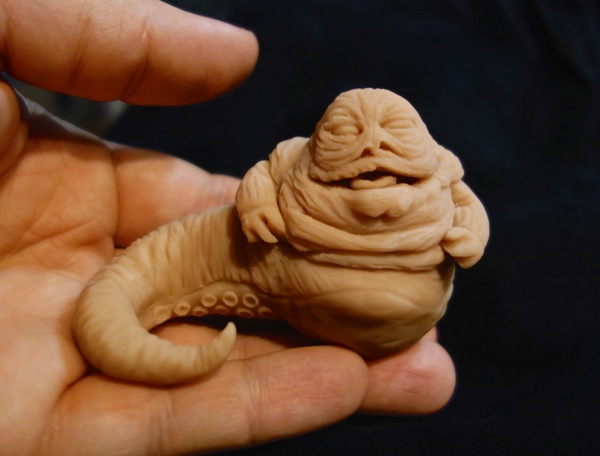
Doing my custom throne for the Black Series Jabba figure involved a fair amount of sculpting and it went fairly well, so I decided to try my hand at sculpting a complete figure instead of just accessories. I sculpted this small figure out of Super Sculpey clay using a toothpick as my main tool. I started with the Jabba and thought it turned out well, so I made a throne for him as well. Including the throne, it’s about 4 inches wide and 3 inches tall.
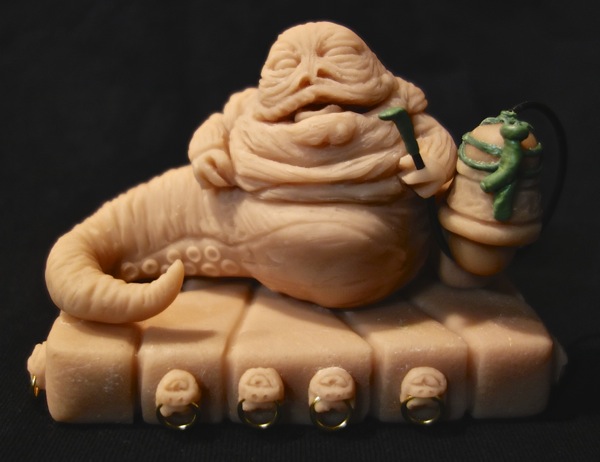
I did it in several pieces/stages, which were fired in the oven and then assembled, although Jabba himself was done all as one piece over a core of aluminum foil. The metal rings are from the jewelry section at Michael’s, and the hose for his hooka is actually a piece of an old earphone cable. The green pieces above are epoxy putty, which I used for things that seemed like they would be too weak or difficult to do in clay. I’m pretty happy with how the sculpt itself turned out. I was impressed with how easy Super Sculpey was to use compared to the clay I’ve tried in the past. And I’ll have to admit that I was surprised how well it all worked out. It’s a good feeling to create something like this out of nothing, and I learned a lot just from doing this one piece.

The paint job, I’m not totally sure about. I’m using a new kind of paints that have a bit of a learning curve, and I’ve also never painted something that I sculpted myself. In any case, I hope to continue to develop my sculpting abilities in the future. I found it quite enjoyable. I think maybe working in a bigger size next time might make things a bit easier, although that may also necessitate adding more detail.

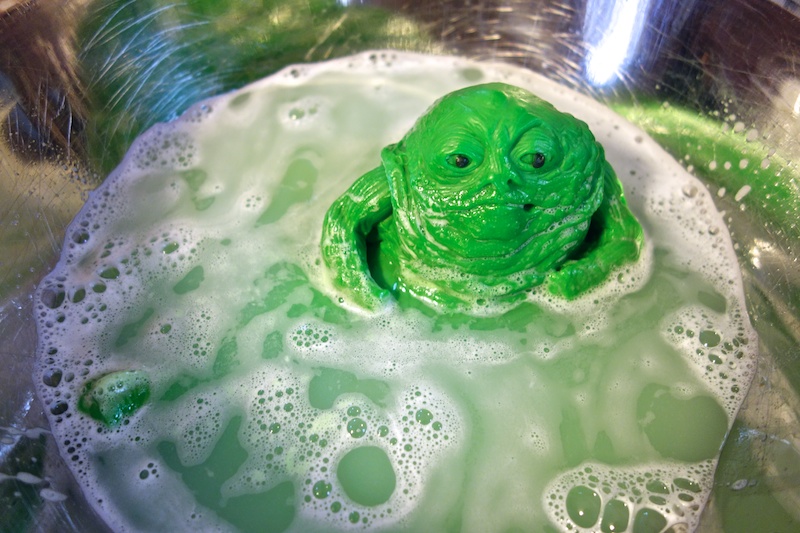
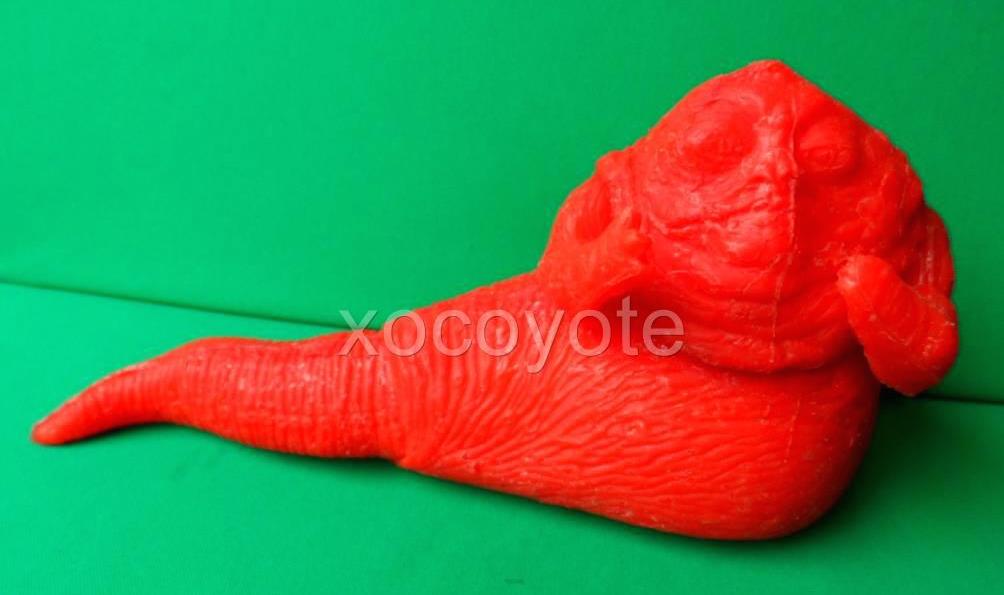
Jabba the Hutt Soap (Based On Vintage Kenner Jabba the Hutt Figure)

I have some vintage Gamorrean Guard soap, but I’ve always wanted Jabba-shaped soap of some kind. I never expected it would be like this, though! I got these from Etsy seller NerdySoap, who has a variety of soaps in the shape of characters from Star Wars and other properties. Many of them were made with the silicone molds that Kotobukiya put out, but some are based on toys. In this case, they obviously made a mold from the vintage Jabba the Hutt figure. One very cool thing about these soaps is that you can choose the color and scent you want, and there are a LOT of choices! It was rather hard to choose, but in the end I went with one pink with cherry scent, one white with coconut scent, and one green with jasmine scent. They come nicely wrapped as you can see below, and each of them also included a small Han in Carbonite soap, as well as some bonus soaps like a Millennium Falcon. Nice!

The detail on these is really pretty impressive, considering that they’re soap. Pretty much all of the detail from the vintage figure is there although of course it’s all one solid piece and the bottom is completely flat. These are shipped from Poland and two of the Jabbas’ tails ended up breaking on the trip to me. However, they sent replacements free of charge, which I was grateful for. I wasn’t planning to use these as actual soap — they’re more for display — so having them intact was important to me. They probably weigh about three times as much as the actual vintage figure, since they’re solid blocks of soap.


I used one of the broken Jabbas to see what it would be like to use these as soap. It’s huge for a bar of soap, but it actually works pretty well. The coloring in the soap gives the water and foam a slight green tinge, and the detail actually seems to stay for quite a while after you start using it.
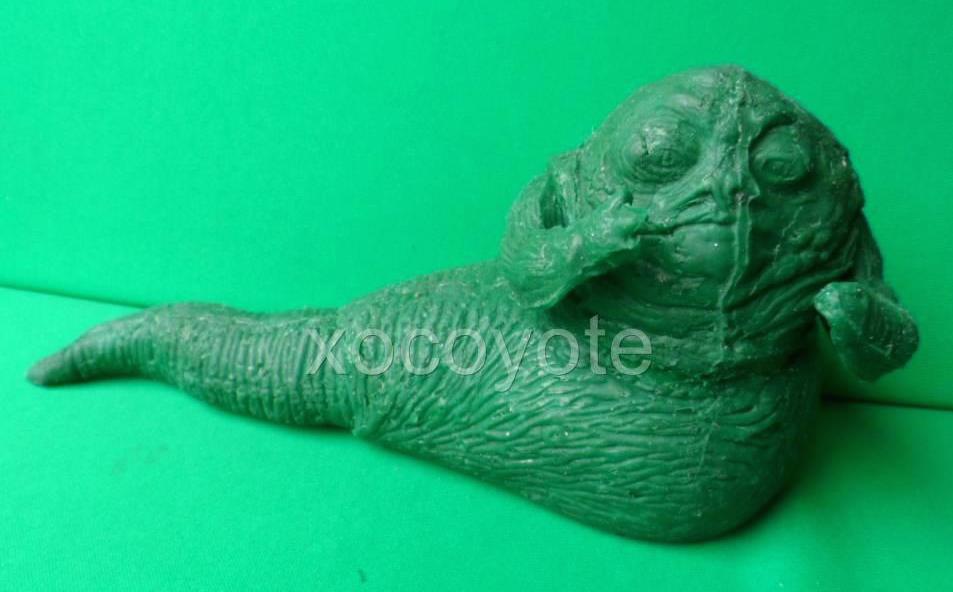
I also got a couple of small soaps based on a small unlicensed Jabba toy from Episode One.

Mexican Rubber Bootlegs of the Vintage Kenner Jabba the Hutt and Gamorrean Guard Figures
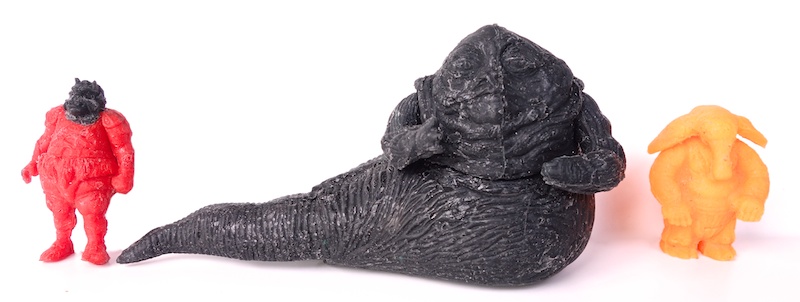
I’ve posted about Mexican bootlegs of Kenner figures before. These kinds of bootlegs are a whole subset of vintage Star Wars collecting, and are usually extremely crappy — but that’s their appeal. Finding the worst paint jobs and color combinations is kind of the point. Most of the Mexican bootlegs I’ve seen are of this variety — made of plastic with limited or no articulation and sloppy paint jobs. But there’s another type that I talked about when I posted about my rubber Max Rebo bootleg. I suppose they’re another rung down the ladder in terms of quality since they’re just made of rubber (more like silicone, actually) and typically have no paint on them at all.

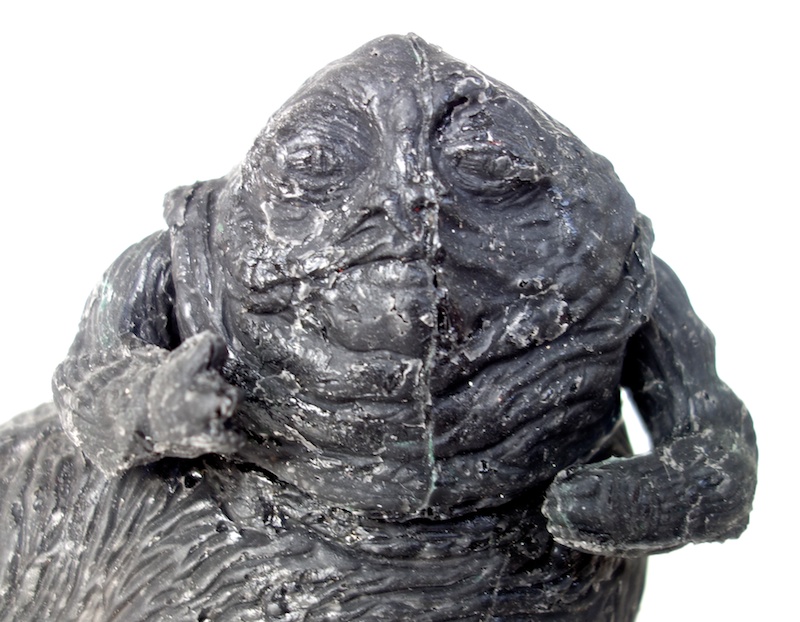
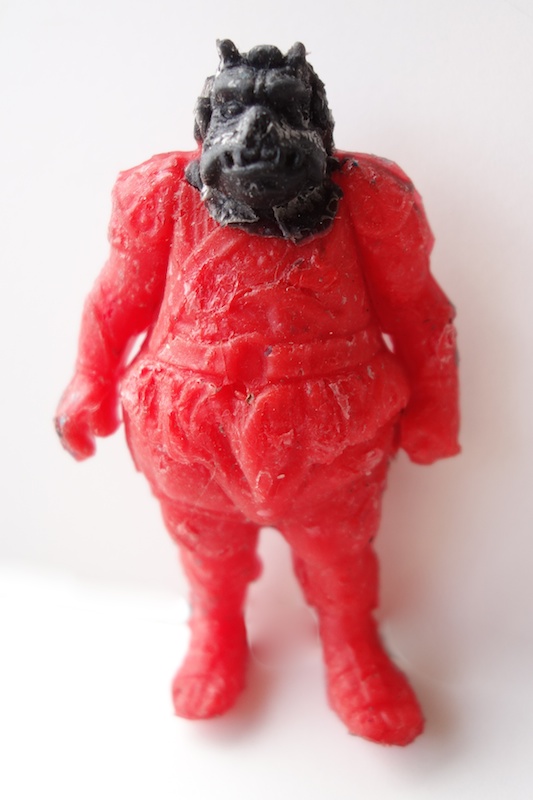
I’ve seen a fair number of these made of regular Kenner figures, but I had never seen a Jabba before. I had always figured that this was because the vintage Jabba figure was both too big and too common to make bootlegging worthwhile. But three of these cropped up on eBay a while ago. There were three colors: green, red and black. (For informational purposes, I’m posting photos of the colors I don’t have, taken from the eBay listing.) These weren’t cheap, actually (significantly more than an actual vintage Jabba, although not terrible) so I didn’t try to get all three colors. Instead, I went for the black one since it’s rather unusual.
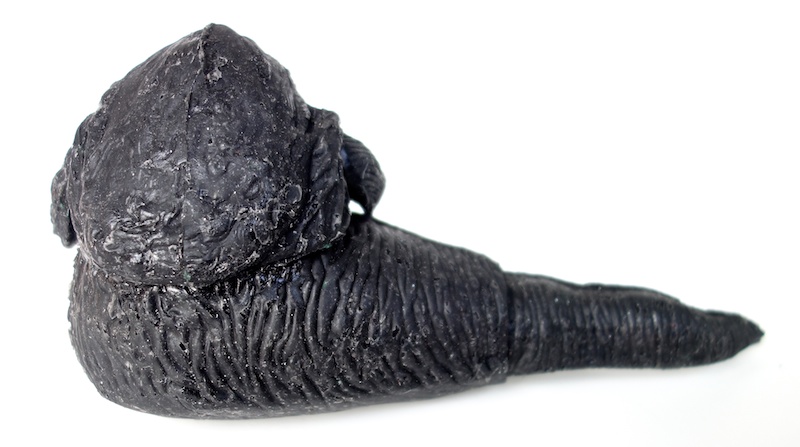
Unlike the others, which are just blocks of solid rubber, this Jabba is squishy and filled partially with air. It looks like it was actually made in pieces and glued together, similar to the way the actual vintage Jabba was assembled. Despite its rather rough appearance, such as the very visible mold line right down the middle of the face, this must have taken some time and effort to produce.
The Gamorrean is like the Max Rebo figure I mentioned earlier, in that it’s just solid rubber, but it is different in that they used a separate color for the head. I’m not sure how they achieved this, since it looks like there’s red rubber under the black. They’re not separate pieces as far as I can tell.
With this kind of thing it’s always difficult to tell when they were made. I am assuming that these are modern bootlegs — perhaps even made for the express purpose of selling on eBay — rather than vintage era toys that kids might have actually played with. But it’s impossible to know for sure. I find them rather fascinating. Especially the Jabba, since it’s relatively intricate.
Custom Throne for Black Series Jabba the Hutt Figure

I’ve mentioned before how Hasbro released the regular version of the Black Series Jabba the Hutt figure with no accessories whatsoever. And even the SDCC-exclusive version that came with the hooka/railing and Salacious Crumb seems rather incomplete without a throne. That’s why a lot of people are trying their hands at making their own thrones. I’ve seen people make them out of florist’s foam, insulation foam (version 2 here), and styrofoam (also here). But I wanted something a bit closer to the Sideshow Jabba’s throne — completely sculpted. I’ve dabbled a little bit with sculpting for various customization projects, but I’m still very much a beginner, so this was a major project.
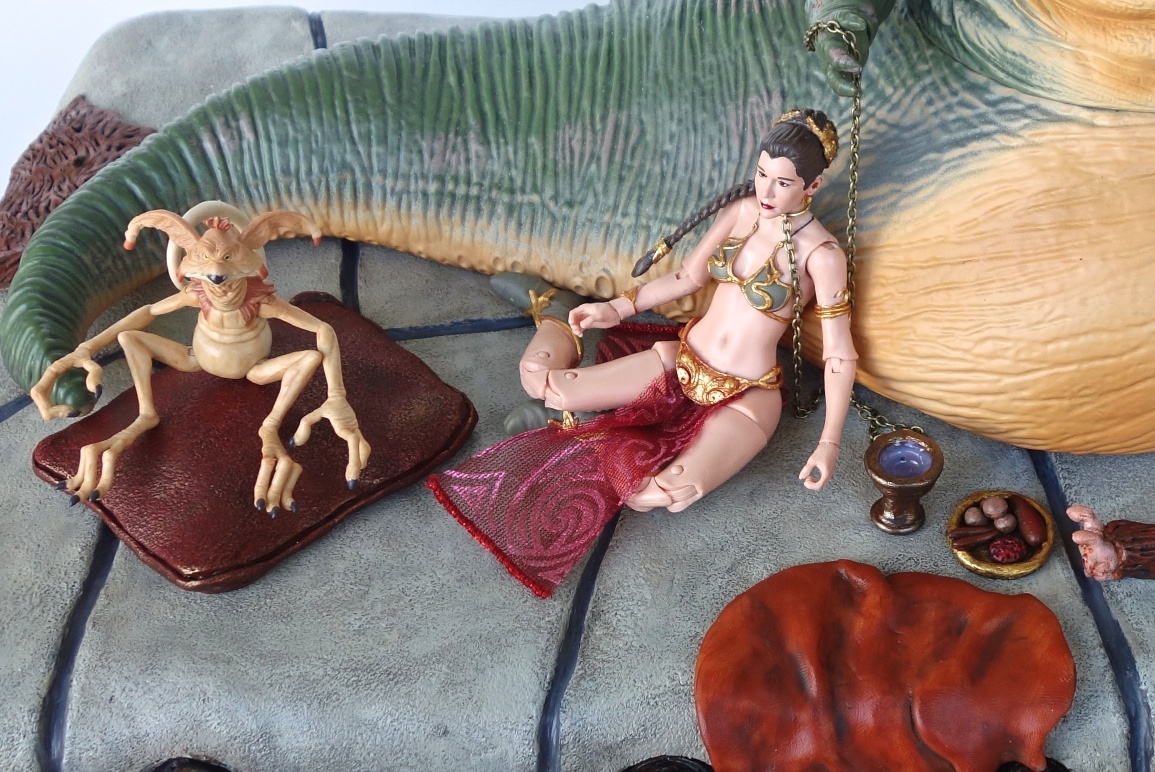
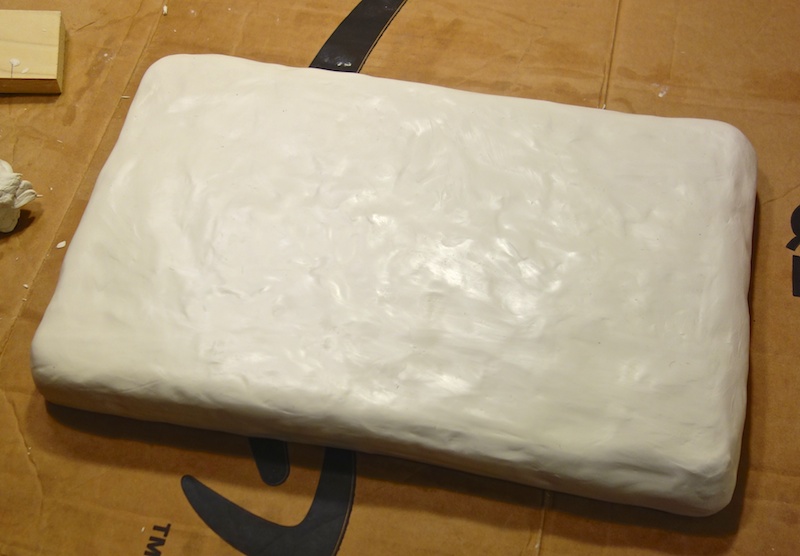
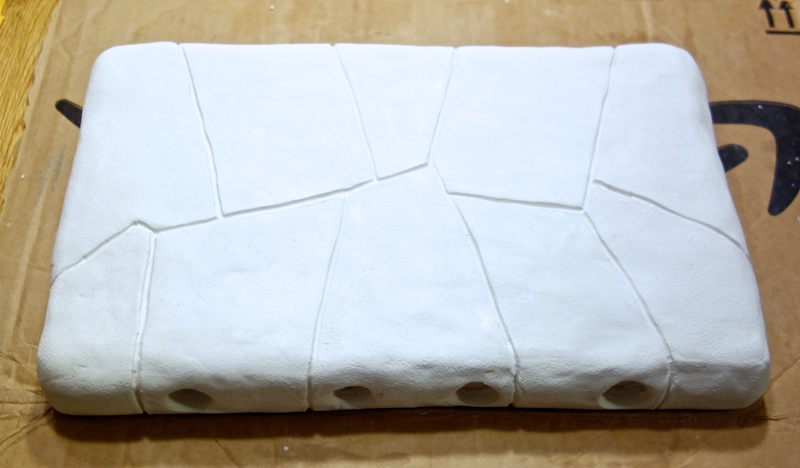
I sculpted the throne from Sculpey on top of a wooden base that I put together out of wood scraps, with a number of nails pounded in it to give the Sculpey something to grab onto. I knew that sculpting the throne out of a solid block of modeling clay would not be a good idea, and I experimented a bit using things like aluminum foil as the base without any luck. So this was my solution. It did end up working pretty well, although it’s rather heavy.
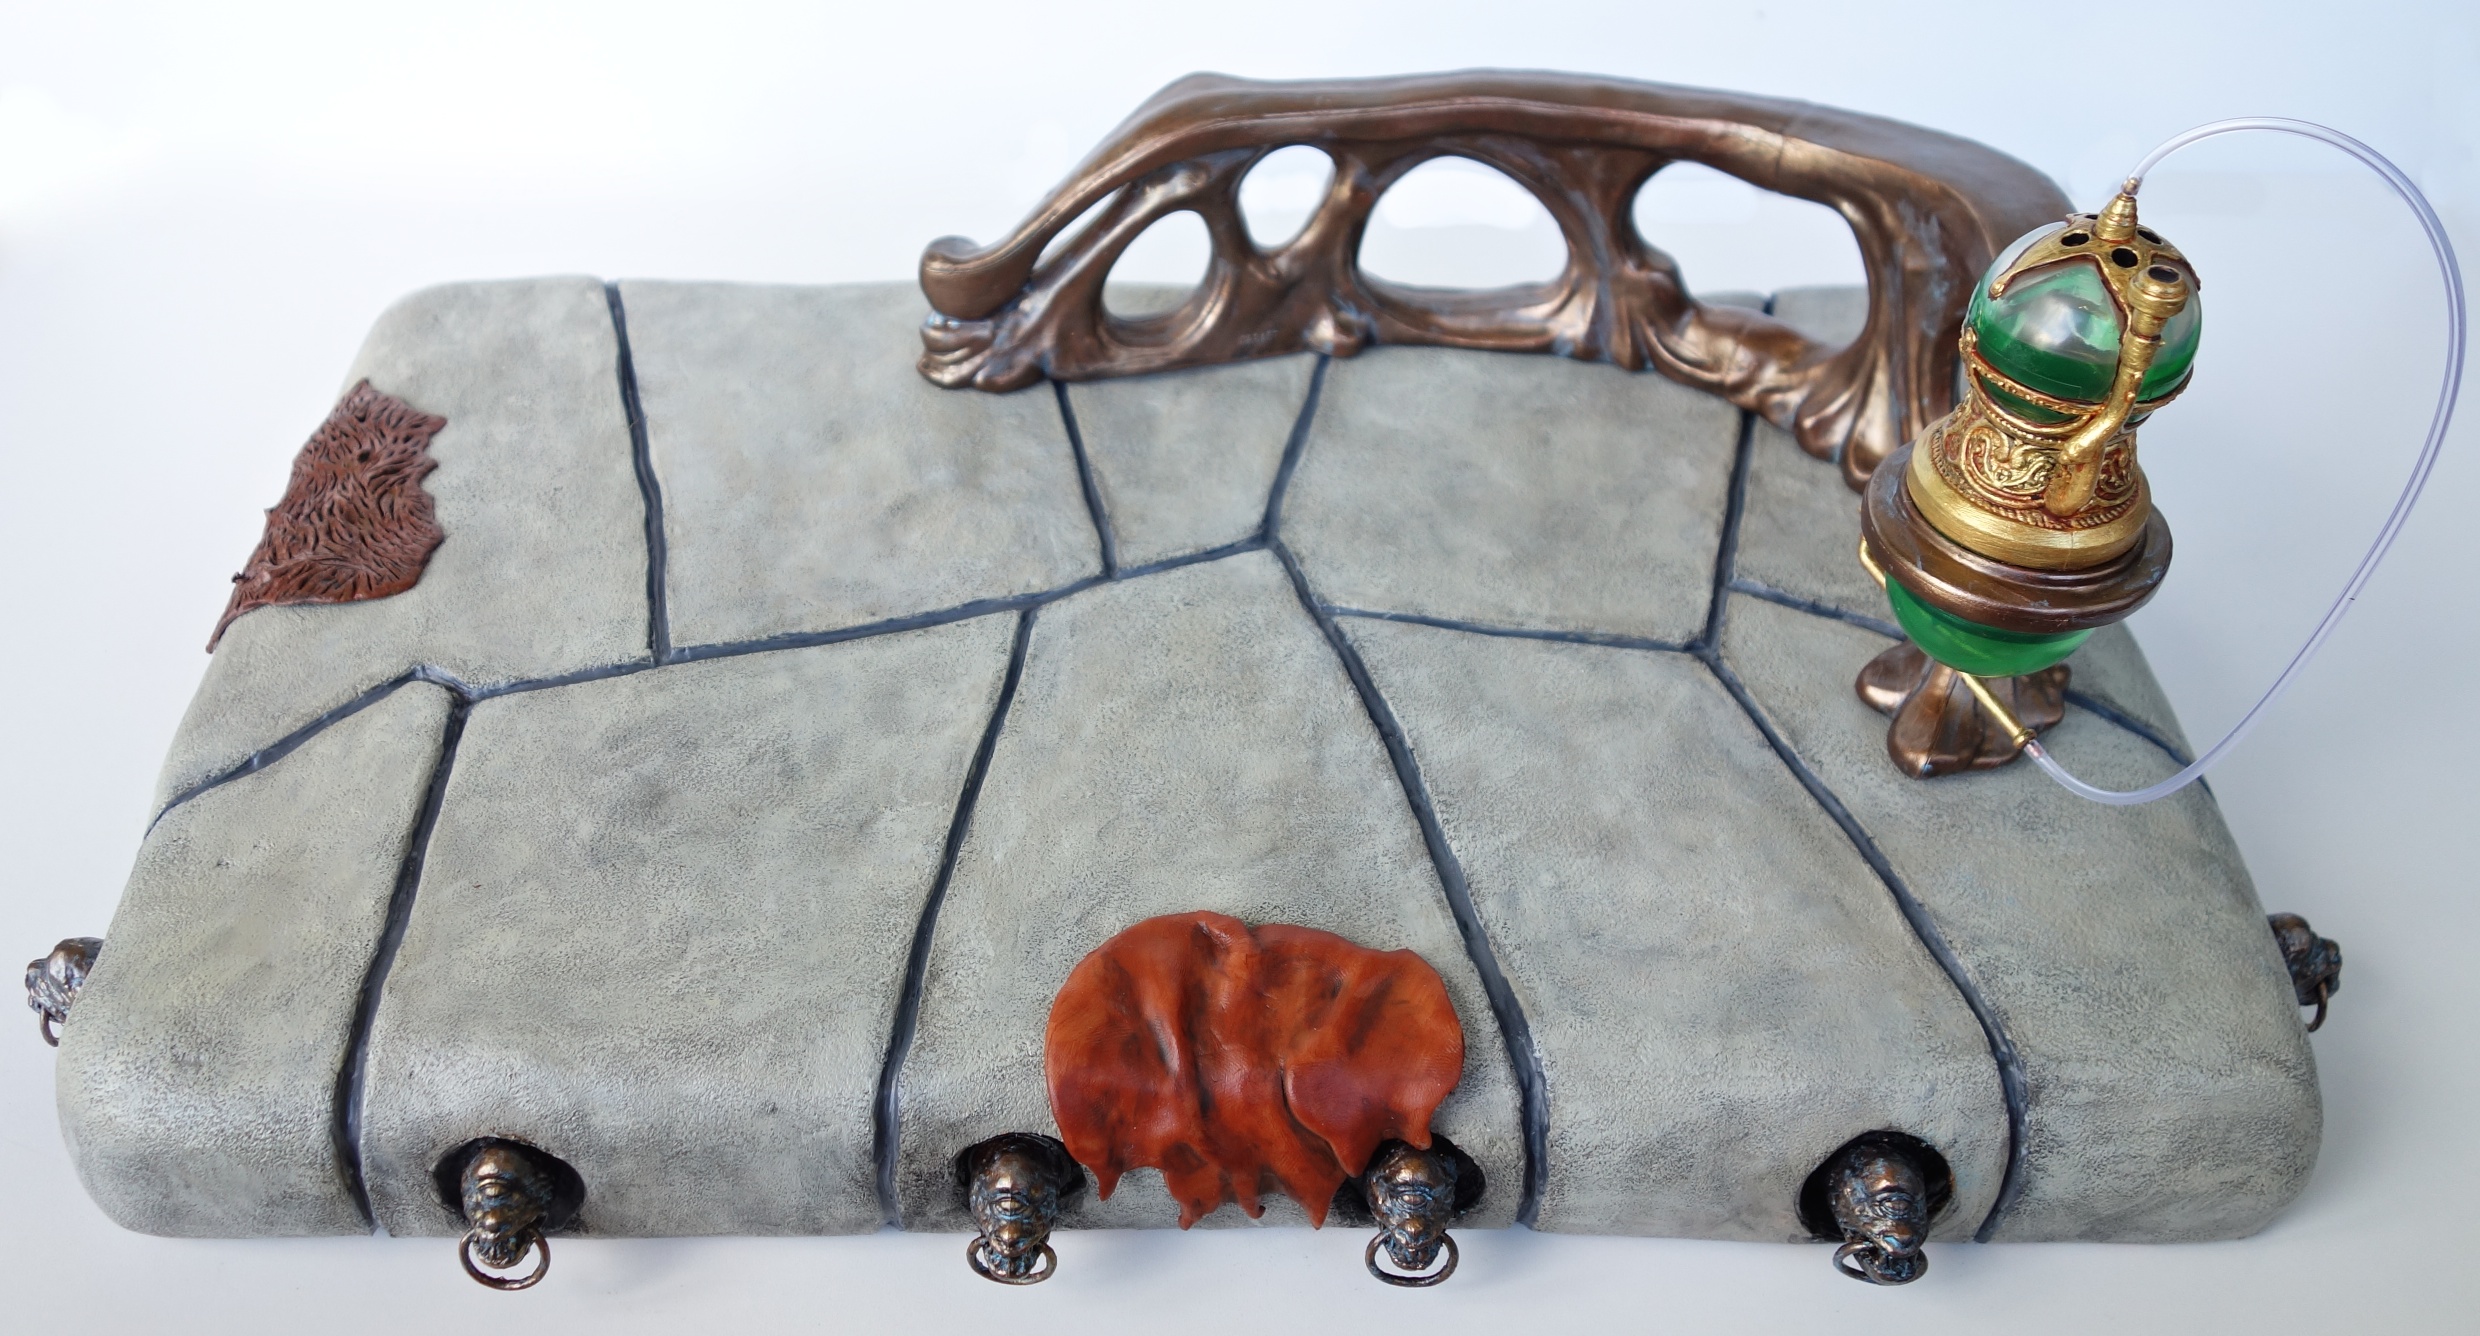
First I spread the Sculpey over the wooden base. It was pretty difficult to get it even. This was the best I could do, but I noticed afterward that the edges were more rounded than they probably should be.
Then I added the cracks. I guess the real throne was supposed to be made of a number of blocks joined together?
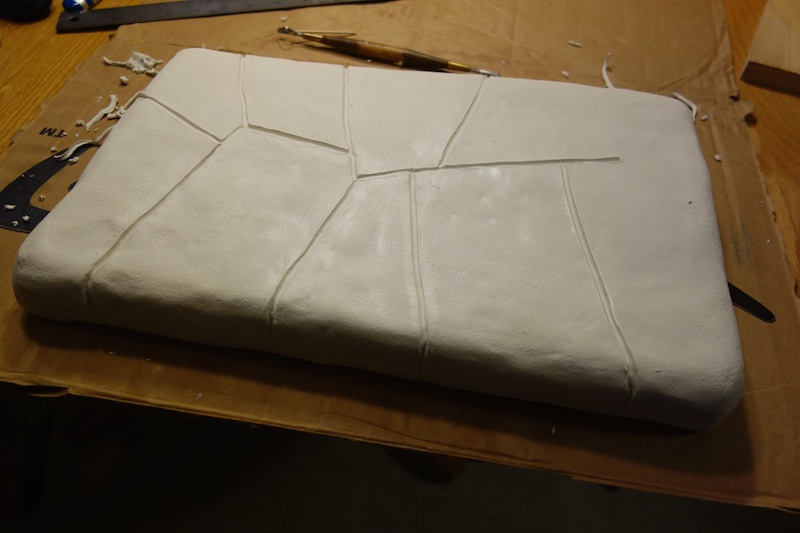
Then I pressed some coarse sandpaper up against the surface of the clay to give it some stone-like texture (although you can’t really see it here). I also punched out holes for the gargoyles with the neck of a water bottle, which happened to be the right size. At first I thought I might have to sculpt new gargoyles, which would have been a lot of work, but after seeing some others use the heads from the vintage Kenner playset, it became pretty obvious that they would work even in this larger scale. (I believe the gargoyles are actually a bit oversized for the smaller figures.) I drilled holes in the heads, added metal rings and filled in some of the existing holes in their mouths with epoxy putty before painting them.
I sculpted some accessories like pillows, an animal skin, a piece of cloth (not pictured), a food plate and cup, and finally a little rat-slug creature. I’m not sure what this one’s called, but he was included in Sideshow’s Salacious Crumb Creature Pack. The ones in green were made from epoxy putty, while the tan pillow and piece of cloth were made using Super Sculpey.

Here’s the finished throne by itself. I repainted the Habsro throne and hooka, since they were just bare plastic and didn’t really fit in with the throne. The Leia figure above has also been partially repainted — mostly just to add real metallic looking gold to her bikini, but also retouch her face a bit. This was all quite a bit of work, but I’m pretty happy with the results. Have you tried your hand at making a throne? What did you use, and how did it turn out? Feel free to link to pictures in the comments.
Jabba the Hutt Huaco Pottery (Pre-Columbian Style Pottery From Peru)
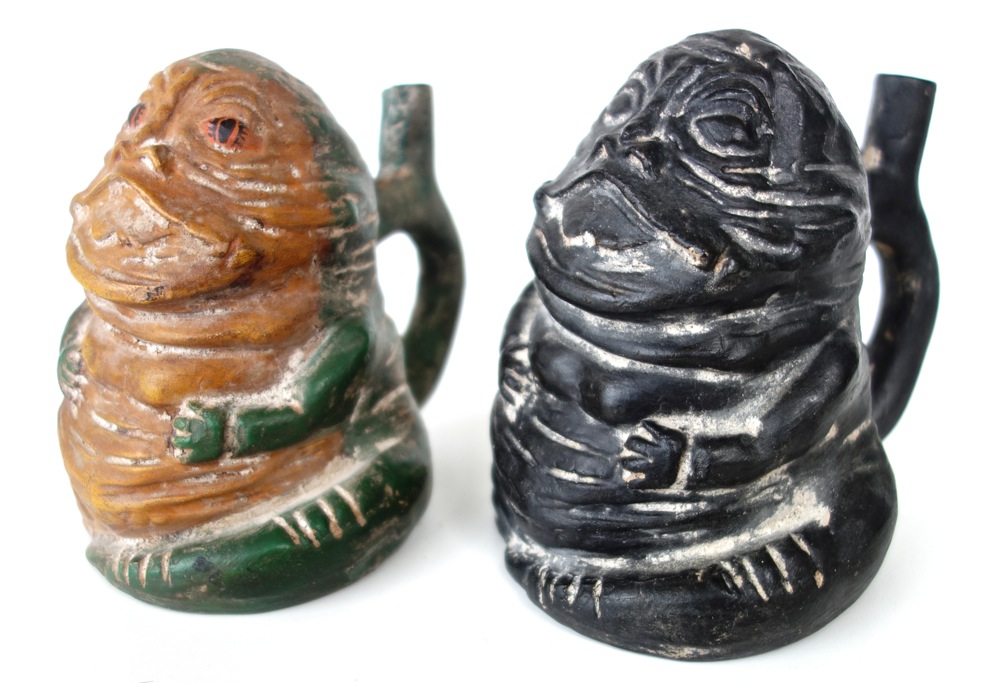
Huaco pottery is a type of pottery associated with the Incas and other pre-Columbian cultures. They were apparently ceremonial in nature and were often made in the shapes of people or animals. These are part of a series of “Original Huaco” made by “nanonavarrete” and sold on eBay. They come in a variety of Star Wars designs (plus one Iron Man for some reason). Some of the designs, like this one, come in both color and B&W designs. (There’s also an R2-D2 that’s not pictured.)

I couldn’t really decide on just one so of course I had to get both. The B&W version looks more like something that could plausibly be a real ancient artifact, while the color version is more obviously Jabba. But then again, the actual Huaco pottery was apparently painted, so maybe the colored one is actually closer to the real thing.

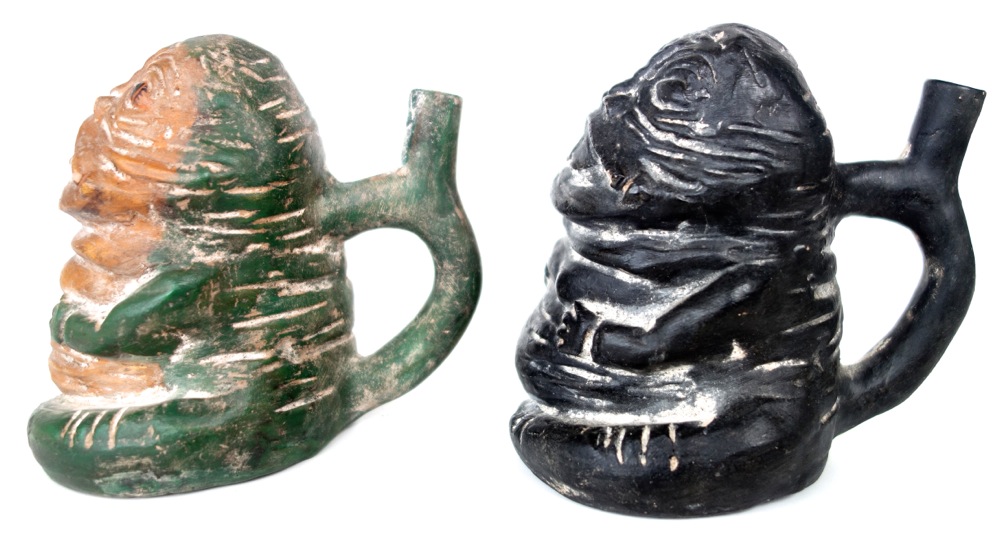
They’re about 6 inches tall and have handles on the back. The handles are typical of this kind of pottery, but I think they would normally be found on something that was used as a vessel for holding liquid. On these, they don’t really serve a purpose aside from being decorative.
I love unusual and quirky collectibles like these, but they’re a little on the expensive side and when you add in the high cost of shipping from Peru, they’re probably a little bit of a hard sell to most people. I’m glad to have them, though.


